

Discover the Delightful Egyptian Meringue Cake: A Unique Treat to Savor
Experience the exquisite delight of the Egyptian Meringue Cake—an irresistibly tender and colorful dessert that promises to captivate your senses. Follow our detailed step-by-step guide with tips, photos, and expert advice to create this extraordinary cake at home.
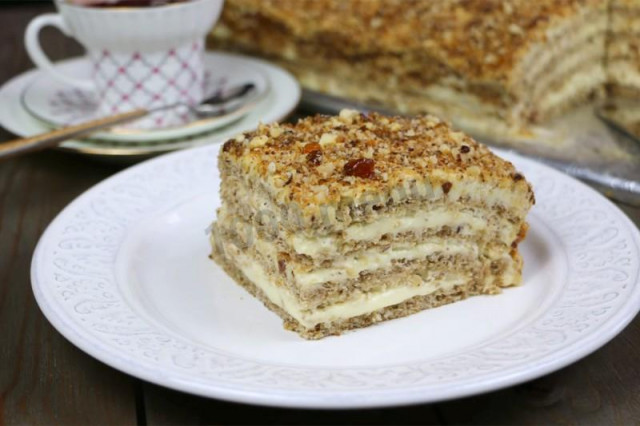
This Egyptian Meringue Cake is incredibly soft and bursting with vibrant flavors—truly a one-of-a-kind dessert experience! If you haven’t tried anything like this before, it’s time to start baking. For your first attempt, consider making half the recipe, yielding a delightful 2.2-pound (1 kg) cake—just enough to savor and share.
Step-by-Step Preparation Guide
Total preparation time: 3 hours
Step 1:

Gather your ingredients for the cake layers. Finely grind the walnuts using a food processor, blender, or knife. Specialized nut graters used in making pastries like baklava also work well. Divide all ingredients in half since each layer’s batter is prepared separately and baked immediately.
Step 2:

Line your baking sheet with high-quality parchment paper that has a reliable non-stick, oil-based coating to prevent the cake from sticking.
Step 3:

Separate 10 eggs, using the whites for the cake layers and the yolks for the cream filling.
Step 4:

Combine the ground walnuts with flour.
Step 5:

Add a pinch of salt to the egg whites and begin whipping.
Step 6:

Once the egg whites have expanded and formed a fluffy mass, gradually incorporate sugar in portions.
Step 7:

Continue whipping until smooth, glossy peaks form and the sugar fully dissolves. Using fine sugar helps achieve this texture.
Step 8:

Gently fold the walnut and flour mixture into the whipped egg whites.
Step 9:

Mix carefully using folding motions to maintain the airy texture.
Step 10:

Transfer the batter onto the prepared baking sheet.
Step 11:

Level the surface with a spatula for even baking.
Step 12:

Bake in a preheated oven at 350°F (180°C) for 15-20 minutes. The layer should feel springy to the touch.
Step 13:

Carefully transfer the baked layer with parchment onto a cooling rack and allow it to cool completely.
Step 14:

Once cooled, gently peel off the parchment from the cake layer.
Step 15:

Place the cake layer on a clean side of parchment paper and set aside until assembly. Repeat the process with the remaining batter to bake the second layer.
Step 16:

While the layers bake, prepare the custard cream. Measure all ingredients carefully.
Step 17:

Sift flour and mix it with half of the sugar.
Step 18:

Combine egg yolks with a small amount of milk.
Step 19:

Incorporate the flour and sugar mixture into the yolks.
Step 20:

Stir thoroughly until smooth. If the mixture is too thick, add a bit more milk.
Step 21:

Pour the remaining milk into a saucepan.
Step 22:

Add sugar and bring the milk mixture to a boil.
Step 23:

Slowly pour the hot milk into the yolk mixture while whisking continuously.
Step 24:

Return the combined mixture to the saucepan.
Step 25:

Cook over medium heat, stirring constantly to prevent burning, until the custard thickens. The cream is ready when a line drawn on the back of a spoon with your finger stays intact.
Step 26:

Add a splash of vanilla extract to the finished custard. If using vanilla sugar, mix it with regular sugar before starting.
Step 27:

Transfer the custard to a bowl.
Step 28:

Cover the surface directly with plastic wrap to prevent a skin from forming and allow it to cool to room temperature.
Step 29:

Make sure your butter is softened to room temperature by the time the custard cools.
Step 30:

Gradually incorporate softened butter into the custard base, mixing gently to avoid curdling.
Step 31:

The resulting cream will be smooth and luscious. Chill it in the refrigerator for about 30 minutes.
Step 32:

After chilling, the cream thickens perfectly for assembling the cake.
Step 33:

For the praline cream, measure the ingredients as specified.
Step 34:

Place sugar into a pan and heat it over medium flame.
Step 35:

Stir occasionally until the sugar melts completely into a golden caramel.
Step 36:

Add hazelnuts to the caramel and mix well.
Step 37:

Pour the caramel-nut mixture onto parchment paper and let it cool completely until hardened.
Step 38:

Remove the parchment paper from the hardened praline.
Step 39:

Break the praline into smaller pieces.
Step 40:

Grind the praline pieces finely using a coffee grinder or your preferred method.
Step 41:

Before assembling, whip heavy cream (35% fat) with powdered sugar until soft peaks form.
Step 42:

The whipped cream is ready when it leaves a distinct trail from the whisk.
Step 43:

Gently fold the praline into the whipped cream, reserving some praline for decorating the cake.
Step 44:

Slice each cake layer in half horizontally to create four thin layers. Use a cutting board for precision.
Step 45:

Spread the custard cream evenly on the first layer.
Step 46:

Top with a layer of praline cream.
Step 47:

Repeat layering with all cake and cream layers.
Step 48:

Smooth the top and sides of the assembled cake.
Step 49:

Sprinkle the cake with reserved praline for an elegant finish.
Step 50:

Refrigerate the cake for 3-4 hours to allow the layers to soak up the flavors and the cream to set, ensuring clean slices.
Step 51:

Enjoy your stunning and delicious Egyptian Meringue Cake, a true showstopper for any occasion!
Discover engaging topics and analytical content in Homemade Cakes as of 01-08-2024. The article titled " Discover the Delightful Egyptian Meringue Cake: A Unique Treat to Savor " provides new insights and practical guidance in the Homemade Cakes field. Each topic is meticulously analyzed to deliver actionable information to readers.
The topic " Discover the Delightful Egyptian Meringue Cake: A Unique Treat to Savor " helps you make smarter decisions within the Homemade Cakes category. All topics on our website are unique and offer valuable content for our audience.