

Creative DIY Crafts for Celebrating February 23rd Using Everyday Items
Explore engaging and easy-to-make crafts perfect for schools or gifting on February 23rd. These projects are kid-friendly and use simple materials to create binoculars, cards, soldiers, and more.
With these step-by-step guides, even children can enjoy crafting unique gifts and decorations.
DIY Binoculars Project

Materials Needed
- Two cardboard tubes from toilet paper rolls;
- One cardboard tube from food wrap;
- Green gouache paint;
- Green and light green colored paper;
- Red paper or star-shaped stickers;
- Glue or a glue gun;
- Paintbrush;
- Scissors;
- Narrow ribbon;
- Ruler;
- Pencil.
Instructions
Prepare all materials. Cut 3 cm off the food wrap tube.

Paint all tubes with green gouache and let them dry.

Cut green paper into 1 cm-wide strips. Apply glue to a light green strip and wrap it around one of the wider tubes, leaving about 5 mm from the edge.

Next to it, glue a darker green strip.

Attach another green strip at the other end of the tube.

Place a star sticker in the center of the tube. If unavailable, cut two stars from red paper and glue one on.

Decorate the second wide tube similarly to create the binocular lenses.
Place them star-side up. Glue the food wrap tube to the side of one lens just below the green ring. Let it dry.

Attach the other lens to the opposite side of the connector.

Cut a ribbon length that fits comfortably over the head. Apply glue to one end and insert it into one lens.

Insert the other end of the ribbon into the second lens.

Watch this detailed tutorial on making the binoculars:
Alternative Versions
Here is a similar binoculars craft using a sponge instead of a food wrap tube:
How to Craft a Stylish Greeting Card

Materials Needed
- Black paper, 21 x 30 cm;
- White paper, 14 x 40 cm and 6 x 15 cm;
- Red paper, 13 x 13 cm;
- Glue;
- Three buttons;
- Decorative stickers.
Instructions
Fold the large white sheet in half. Apply glue to one half on the outside, leaving about 1 cm unglued near the fold for the collar later.

Place the black paper horizontally and glue the white paper in the middle with the fold facing down. Fold the black edges over the white paper and smooth the creases.

Fold one inner corner outward to form a long triangle resembling a jacket lapel.

Repeat symmetrically with the other inner corner.

Create the collar by folding the smaller white paper lengthwise, leaving the right side about 1 cm wider than the left.

Trim the extra 1 cm width, leaving a 4 cm tab in the middle.

Glue the collar tab to the top edge of the card between the black and white papers. Trim the collar to the card width and fold its ends inward at an angle under the lapels.

Craft a tie from red paper as shown in the video or simply cut one out.
Glue the tie below the collar.

Decorate the jacket with stickers.

Glue three buttons evenly spaced under the lapels.

Optionally, write a heartfelt greeting inside the card.

For more clarity, watch the full video tutorial:
Additional Card Ideas
Create a 3D airplane card soaring through clouds:
Or craft a maritime-themed ship composition:
Try a magical tank card that alternates between color and black-and-white:
Find more inspiring card ideas in our article.
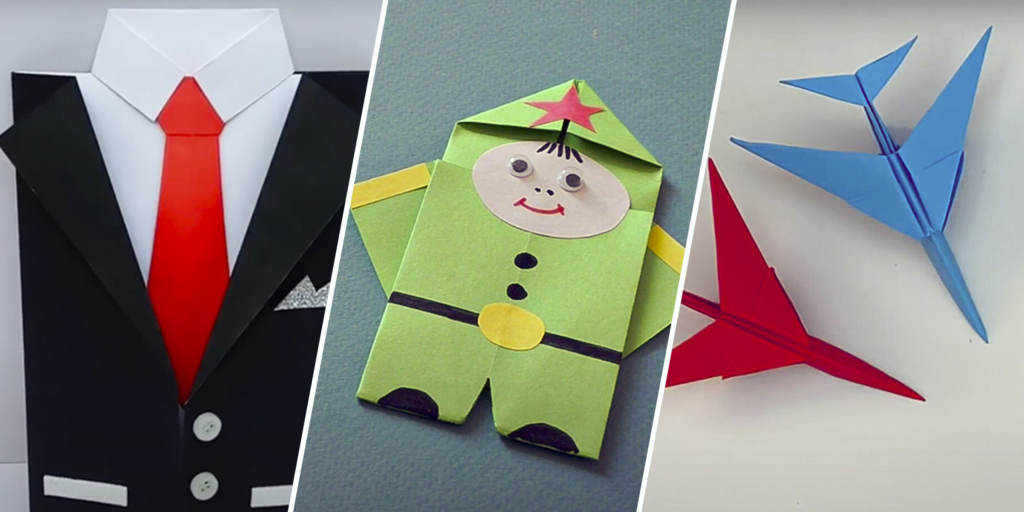
How to Make a Paper Soldier

Materials Needed
- Green paper, 10 x 17 cm;
- Beige paper;
- Yellow paper;
- Red paper or star sticker;
- Black cardstock;
- Optional: googly eyes;
- Markers;
- Glue;
- Scissors;
- Ruler.
Instructions
Fold the green paper in half lengthwise, aligning edges and smoothing the crease. Unfold to mark the center.

Fold one long edge to the center crease.

On one side, fold two corners toward the center to form a triangle tip. Mentally divide the remaining space in half and place your finger in the middle.

From the finger point, fold the edges outward symmetrically as shown.

Fold the piece so the bottom straight edge is about a finger's length from the top triangle.

You should have a figure like this.

Apply glue to the inside of the top corners and attach them to the base to prevent flaps.

Apply glue between the outward folded corners at the bottom and press to secure the folded shape.

Cut an oval from beige paper sized to fit between the folded bottom edge and the top triangle. Attach it as the soldier's face.

Draw facial features with markers or use googly eyes.

Cut a red star from paper or use a sticker and place it on the triangle. Draw buttons with a marker.

Draw a belt below the side triangles using a ruler. Cut a yellow buckle from paper and glue it on.

Add yellow stripes on the upper parts of the triangle arms to represent epaulets. Cut a small triangular notch at the bottom to indicate legs and draw semicircular boots.
Discover the latest news and current events in DIY as of 25-04-2022. The article titled " Creative DIY Crafts for Celebrating February 23rd Using Everyday Items " provides you with the most relevant and reliable information in the DIY field. Each news piece is thoroughly analyzed to deliver valuable insights to our readers.
The information in " Creative DIY Crafts for Celebrating February 23rd Using Everyday Items " helps you make better-informed decisions within the DIY category. Our news articles are continuously updated and adhere to journalistic standards.