

Create a Custom Laptop Stand for a More Comfortable Workspace
Learn how to craft a simple, portable laptop stand that enhances your workspace ergonomics and saves desk space.
At gadgets.masterkit.ru, we curate an electronic mini-magazine featuring fascinating tech and electronic innovations. We’re excited to share some of our best articles here on Lifehacker’s blog.
Using a laptop on the go is incredibly convenient, but at home or in the office, pairing it with a full-sized keyboard and elevating the screen to eye level can significantly improve comfort. This setup helps prevent neck strain from poor posture and reduces eye fatigue during extended work sessions.
To achieve this, you can easily build a compact and lightweight laptop stand from everyday materials. It’s portable, easy to disassemble, and helps organize your workspace more efficiently. The tilted design reduces the laptop’s footprint on your desk, creating room underneath for keys, phones, and other small items.

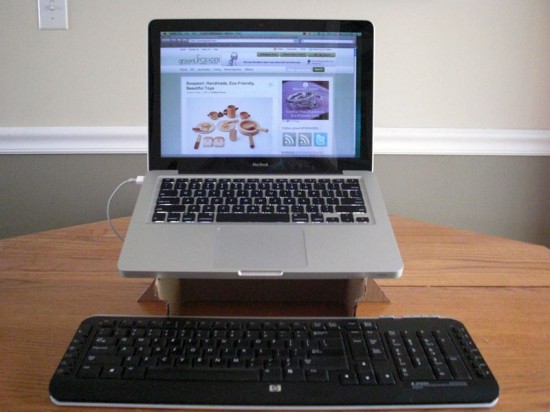
Set up a comfortable, stationary workstation with your laptop in just minutes.
Since laptops come in various sizes, crafting your own stand is often easier and more cost-effective than buying one. Start by practicing with cardboard boxes to perfect your design. Once satisfied, create the final stand from plywood, plastic, or any preferred sheet material in your desired color. You can even add decorative elements if you like. Don’t forget to attach felt pads underneath to protect your desk from scratches.
The manufacturing process is straightforward.
Step 1
Draw or print a template. Keep in mind that part 1 on the template represents only half of the actual piece, so mirror it along the right vertical edge to complete the shape. Part 2 shows the side profile of the stand.
The template serves as a guide; adjust the length, width, and tilt angle to perfectly fit your laptop’s dimensions.

Draw part 1 twice, mirroring it along the right vertical edge.
Step 2
Cut out the stand pieces from cardboard using scissors or a utility knife—just be careful not to damage your work surface.

You’ll need only three pieces to assemble the stand.
Step 3
Slot the pieces together, and your stand is ready!

Notice how the tilt reduces the laptop’s desk footprint, freeing up valuable space.
Now, select a beautiful sheet material and use your proven cardboard template to build the final stand. This will provide ergonomic comfort, an optimal viewing height for your eyes, and extra space for pens, keys, phones, flash drives, and other essentials.
Create a useful, handmade accessory that improves your daily work routine.
Subscribe to our mini-magazine via email and follow our blog here on Lifehacker for more inspiring DIY projects!
via
Discover the latest news and current events in Expert Advice & Insightful Articles as of 01-12-2015. The article titled " Create a Custom Laptop Stand for a More Comfortable Workspace " provides you with the most relevant and reliable information in the Expert Advice & Insightful Articles field. Each news piece is thoroughly analyzed to deliver valuable insights to our readers.
The information in " Create a Custom Laptop Stand for a More Comfortable Workspace " helps you make better-informed decisions within the Expert Advice & Insightful Articles category. Our news articles are continuously updated and adhere to journalistic standards.