

Mastering Pull-Ups: A Step-by-Step Guide
If you can’t do a single pull-up yet, avoid swinging or jerking movements to prevent injuries. Begin with preparatory exercises to strengthen your muscles, then progress to your first pull-ups with proper form.
Effective exercises suitable for all fitness levels along with a detailed breakdown of correct pull-up technique.
If you’re unable to perform even one pull-up, resist the urge to swing or jerk your body just to get the movement done. Such jerks can lead to injuries, especially to the shoulder joints.
Therefore, we’ll start with foundational exercises to build your muscle strength, followed by guidance on executing your first pull-ups with proper technique.
Preparing Your Body for Pull-Ups
These preparatory exercises will engage all the muscle groups essential for pull-ups and enhance neuromuscular coordination for this movement.
Your workout routine should include:
- Shoulder engagement holds — 5 sets of 10 seconds.
- Top position holds — 5 sets of 60 seconds, or negative pull-ups — 3 sets of 15 reps.
- Australian pull-ups — 5 sets of 10 reps.
- Assisted pull-ups using resistance bands or support from a chair — 5 sets to failure.
Perform these exercises every other day to allow your muscles to recover and grow stronger.
Activating Shoulders While Hanging

This exercise enhances grip strength and helps you memorize the correct starting position.
Grab the pull-up bar with an overhand grip, hands slightly wider than shoulder-width. Hang with straight arms, engage your core, lower your shoulders, and squeeze your shoulder blades together. Hold this position for 10–15 seconds. Repeat 5 times.
Keep performing this exercise even when it becomes easy; it serves as an excellent shoulder warm-up before pull-ups.
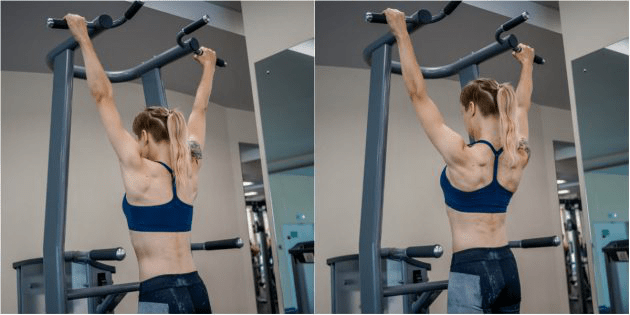
Holding the Top Position

Grip the bar with an overhand grip and jump up to the top pull-up position, with your chin above the bar.
Hold this position for 60 seconds. Perform 5 sets. If you can’t hold for a full minute, hold as long as possible and aim to increase the duration gradually.
Once you can hold for a minute, transition to negative pull-ups.
Negative Pull-Ups
Jump up to grab the bar and use the momentum to reach the top position. If the bar is too high, use a chair for assistance. Pause at the top, then slowly lower yourself down as slowly as possible.
Complete 3 sets of 10–15 negative pull-ups.
Australian Pull-Ups

You’ll need a low bar, a barbell on racks, or even a broomstick placed between two high chairs. The bar must be high enough to fully extend your arms while hanging.
Grab the bar with an overhand grip, keep your feet on the floor, and keep your body in a straight line. Pull yourself toward the bar until your chest touches it, then lower back down. Maintain a tight core and glutes to prevent your hips from sagging.
Perform 5 sets of 10–15 reps.
Assisted Pull-Ups with Resistance Bands or Chair Support
If you have a resistance band, attach it to the pull-up bar and loop one or both legs through it to reduce the load, making pull-ups easier.
If you have bands with varying resistance levels, start with the thickest band and gradually move to thinner ones.
If you don’t have a band, place your feet on a chair and try to minimize assistance as much as possible.
Complete 5 sets to failure. Once you can do 10 assisted reps per set, try unassisted pull-ups.
Proper Pull-Up Technique
Grip Types
An underhand grip emphasizes the biceps, while an overhand grip targets the back muscles more. Pull-ups with an underhand grip are generally easier, so start with this grip.
Once you master good form, switch to an overhand grip.
Starting Position
Hang from the bar with your shoulders near your ears. Then lower your shoulders, squeeze your shoulder blades together, engage your core, and slightly tilt your pelvis forward. This is your engaged starting position.
If the bar is low, extend your legs slightly forward and bend your knees at about a 40–45 degree angle.
Avoid bending your legs at a 90-degree angle as if sitting; this activates hip flexors and stretches your lats, reducing their strength.
Pulling Up
Pull yourself up until your chin passes the bar. Keep your back engaged: your shoulder blades should stay squeezed and your chest pushed forward at the top.
Avoid swinging or jerky movements. The pull-up should be smooth and controlled, moving strictly vertically both up and down.
Don’t crane your neck to complete the reps. Keep your head and neck neutral throughout. Maintain the pelvic tilt and keep your legs extended slightly forward and engaged.
Lowering Down
Lower yourself smoothly without jerks or dropping.
Perform full-range pull-ups until your elbows are fully extended. Partial reps allow more repetitions but don’t provide sufficient muscle load.
Keep your shoulders engaged at the bottom; don’t relax.
Rest Between Sets
Rest 1–2 minutes between sets. Less rest won’t allow full recovery, and longer rest may cool your muscles, making the next set harder.
How Many Pull-Ups to Do
Start with 5 sets to failure. Perform as many reps as you can with good form. If fatigue causes form breakdowns like sudden drops, neck strain, or jerks, stop, rest, and try again.
Doing fewer reps in later sets is normal and better than risking injury.
You can train daily or every other day to allow muscle recovery.
What to Do If You Struggle
Pull-ups are challenging, especially without prior athletic experience. Don’t get discouraged if you can’t do many reps or unassisted pull-ups within the first couple of months. This is common, especially for women with naturally less upper-body strength.
Strengthen the necessary muscles with gym machines and free weights.
Lat Pulldown to Chest

This exercise targets the latissimus dorsi muscles responsible for most of the pull-up movement.
Sit on the bench, grab the handle with an underhand grip, keep your back straight, squeeze your shoulder blades, and plant your feet firmly on the floor. Pull the handle down to your chest without moving your back. Return slowly and repeat.
Choose a weight allowing 8–10 reps with effort on the last reps. Perform 3–5 sets.
Bent-Over Dumbbell Reverse Fly

This targets the rear deltoid muscles. Use light dumbbells (4.5–9 lbs). Bend your torso until parallel to the floor, raise your arms out to the sides and slightly forward, then return.
Perform 3 sets of 10–15 reps.
Bicep Curls

This strengthens the biceps, which play a significant role in pull-ups.
Hold a barbell with arms extended, curl it toward your chest, then lower. Perform 3 sets of 10 reps. Use a weight challenging enough that the last rep is difficult.
Bent-Over Barbell Row

This engages the lats, trapezius, deltoids, and teres major — all crucial for pull-ups.
With straight arms holding a barbell, bend forward with a straight back and slightly bent knees. Pull the barbell toward your abdomen, then lower. Perform 5 sets of 8–10 reps. Select a weight that challenges you on the last reps.
Additional Tips
Continue with preparatory exercises on your rest days to avoid overloading and injury.
Remember to train your entire body: a strong shoulder girdle is great, but overall balance is key.
If excess weight is limiting your progress, combine upper-body training with cardio or HIIT sessions for fat loss. Even a few pounds can make a big difference.
Explore useful articles in Sports and Health as of 14-05-2024. The article titled " Mastering Pull-Ups: A Step-by-Step Guide " offers in-depth analysis and practical advice in the Sports and Health field. Each article is carefully crafted by experts to provide maximum value to readers.
The " Mastering Pull-Ups: A Step-by-Step Guide " article expands your knowledge in Sports and Health, keeps you informed about the latest developments, and helps you make well-informed decisions. Each article is based on unique content, ensuring originality and quality.